Welcome to part 4 of my series on How To Make iPhone Apps with no programming experience – where we’ll turn even the non-programmer into an iOS developer! Here’s the article index for the entire series in case you missed it.
This is an XCode tutorial for beginners so we’ll be going through where to download XCode 5 and introduce you to the main parts of the development environment. By the end of this article, you’ll have a basic understanding of how to navigate the development environment and how to create your first XCode project.
Updated Sept 24, 2013: This article was updated for XCode 5. If you’re on XCode 4, everything in this guide still applies even though the look and feel may be different from XCode 5.
1. Where Can You Download XCode?
The easiest way to get XCode is through the Mac App Store. Click the link to go to the listing.
You can also download it manually if you don’t have the Mac App Store. Just visit the Apple Developer page for XCode.
2. Demystifying The XCode Interface
The diagram below is from the Apple Documentation for XCode. If your interface looks different, make sure you have XCode 5 and not an earlier version.
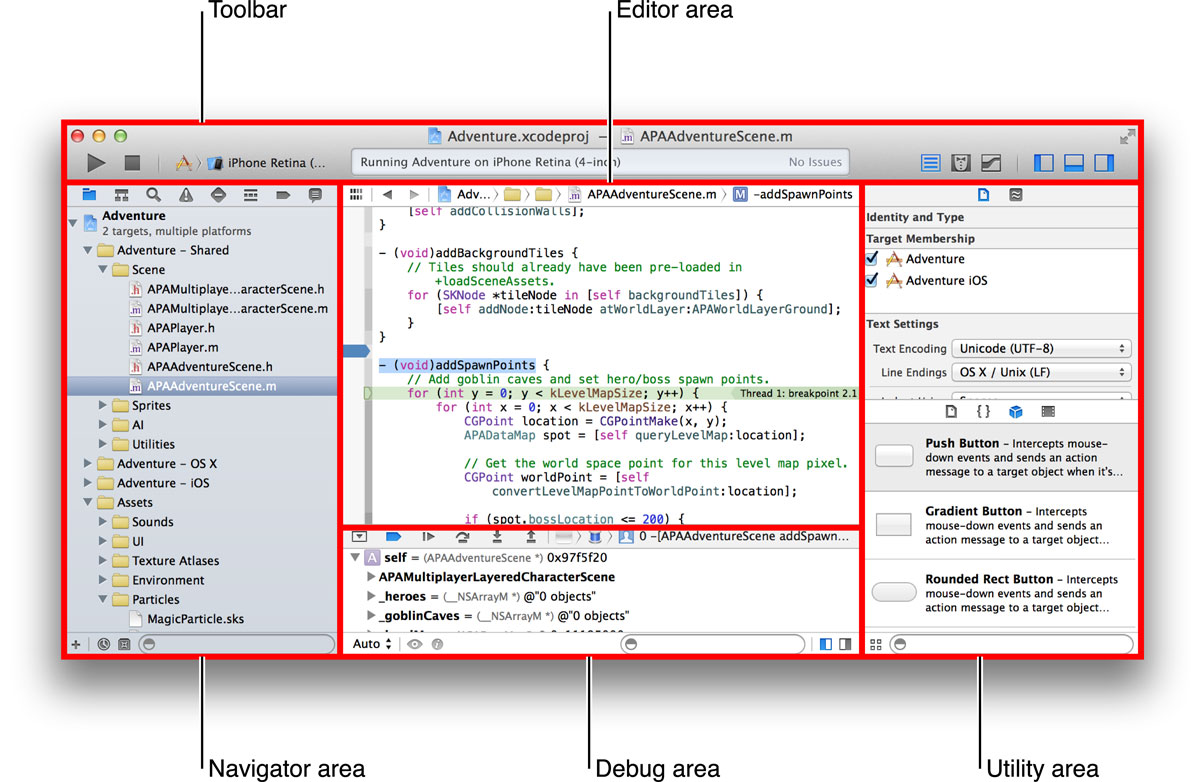
The reason this is a great diagram is because it lets me refer to these different sections of the interface and you can refer back to this diagram to see what I’m talking about!
As you can see from the diagram, there are 4 major areas: the Navigator, Editor, Debug Area and Utility Area.
Keep in mind that you can adjust the size of each of those panes by hovering your cursor over the boundaries of each area and dragging.
You can also show and hide the various areas as needed via the “View” buttons in the upper right hand corner:

This can be helpful, for example, when you’re writing code and you don’t need the debugger area or the utility area. Then you can use the View buttons to hide those 2 panes to give your editor more visible space.
Alright, let’s go through the Navigator area now!
3. The Navigator Area
In this pane, there are a bunch of different navigators that you can switch between using the Navigator selector bar (refer to diagram). The three navigators that you will use a lot are the Project, Search and Issue navigators.
Project Navigator
This is where you’ll see all the files associated with your project.

Within the project navigator, you can also create “Groups” to organize your files in. The gotcha is that when you create a Group in the project navigator (by right clicking and choose Create Group), it doesn’t actually create a folder in the file system; it will only exist in your XCode project so while creating Groups here will organize your file in XCode, it won’t organize the actual files sitting on your hard drive. That’s why I prefer to create the actual directories on my hard drive, organize the files and then drag them back into the XCode project.
You can also right click on the project navigator and create new files or add existing files to your project. Or you can drag folders or files from your computer directly onto the project navigator and will popup a dialog asking how you want to add the files.
If you click on a file in the project navigator, it will display the file’s contents in the Editor area. If you double click a file instead, it will open a new window which can be useful when you have dual monitors.
The root node of the project navigator is your XCode project file (indicated by the blue icon). If you click that, the project properties will open in the editor area.

Search Navigator
With the search navigator tab, you can easily look for pieces of text in your project.

You’ll find yourself using this a lot when you’re looking for a specific property, method or variable and you can’t remember exactly where it is.
Issue Navigator
The issue navigator shows you all the problems with your app.

When you build and compile your application to test, if there are some problems where XCode can’t build your app, it will halt and show you the red colored errors in the issue navigator. You can click on an error and it will show you in the editor area which file and line it’s failing at.
It will also show yellow Warnings in the issue navigator. Although resolving warnings is not necessary for building your app, they’re warnings that there may be potential issues.
3. The Editor Area
The editor area is where we’ll probably be spending most of our time! This is where all the coding happens.

As mentioned in the project navigator section, when you click a file there, it will open the contents in this editor area for you to edit the contents. However, that’s not the only way to navigate to different code files.
Navigation within the editor area
There are these little back and forward arrows in the upper left corner of the editor area. Unfortunately these arrows aren’t labeled in the trusty XCode interface diagram at the beginning of this article so I’ll call them “XCode back and forward arrows” and show you an image of them here:

These guys are actually pretty useful. They act like the back and forward buttons on your browser and they let you navigate to previously viewed files.
Another way to quickly get to the file you need is to use the Jump Bar (see diagram). The jump bar allows you to quickly drill down through your groups and find the file you need. It looks like a breadcrumb at the top of the editor area but when you click a segment of it, it will open up a menu with other groups in that hierarchy level:

If you click the tail segment of the jump bar (which is the current file you’re looking at), it will open up a menu showing you all the methods in the file which is not only useful to jump to another area within the file, but it will show you at a glance what methods are available in this file.

That does it for navigation within the editor area however, it still has some tricks up its sleeve.
Three types of editor views
The editor area has three different views and you can toggle between them with the set of buttons in the upper right hand corner:

The left most button is for the single editor pane view which is good for the small laptop screen if I don’t have an external monitor.
The middle button is the Assistant Editor view which will show you the accompanying file to the file you’re currently looking at. It looks like a two pane view. For example, if you’re looking at the implementation file for a class, the right pane will show you the header file for that class. Each pane also has independent jump bars, so you can also use that to change what file each pane is displaying.

The right most button is the Version Editor view where you can compare two files. Personally, I haven’t found myself using this view so I can’t speak too much about it. Here’s the section for it in the Apple Documentation.
Interface Builder View
So far we’ve been talking about editing code files and writing code, however XCode has interface builder integrated in and when you’re viewing the Storyboard or a XIB file, the editor area will turn into a visual designer.

We’ll be actually using this visual designer view in the next part of the series so we’ll talk about the various elements of it then.
Finding and replacing within the file
Just hit Command-F to bring up a search popup in the upper right corner that will look for whatever you type in within the current file. This is also a great way to jump to various areas of your file. You can also use this popup to do replacements within your file.
Jumping to definitions
If you’re looking at some code and you see a classname that you want to jump to the definition of, you can hold down Command and click the classname to quickly jump to that file.
The breakpoint gutter
The breakpoint gutter (see diagram at top) is where you can click to set breakpoints at certain lines of code. When you set a breakpoint, you’ll see a blue indicator appear. To turn off a breakpoint, just click the blue indicator again and it will dim out.

If you want to completely remove the breakpoint, you can click and drag the blue indicator off of the breakpoint gutter.
To view a list of all the breakpoints that are set in your project, there’s a “breakpoint navigator” tab in the Navigator area.
There’s also a global toggle to turn breakpoints on or off at the top of the editor area which we’ll see when we review the toolbar.
Don’t worry if you can’t remember everything right now. We’ll be working with all of these areas and when you start coding, this will all become second nature to you after a week.
4. The Utility Area
The XCode utility area is comprised of two panes: the inspector pane and the library pane.

The Inspector pane will give you details about the file you’ve got highlighted in your project navigator. However, when you’re looking at a XIB file, the inspector pane will show you the different attributes that you can modify for a selected element.

The library pane won’t be very useful either until you’re looking at a XIB file. When you’re using the Interface Builder part of XCode, you can drag UI elements from the library pane onto the editor area to add that element to your user interface.
If I’m editing code files, I’ll usually hide the whole Utility Area to give my editor more space because I don’t need the inspector pane or the library pane.
5. The Debug Area
The debug area will show you console output and the state of various variables when you run your application.

You’ll be using this a lot while debugging your code and trying to figure out why things aren’t working out the way you expect them to! I’ll need to write a separate XCode debugger tutorial because there’s too much to mention here.
6. The Toolbar
We’ve talked about some of the buttons on this tool bar already. Let’s start from the left.

The left-most button is the run button. This will build and run your application and launch your app in the iOS Simulator. The button beside it will stop the execution of your application and return you to XCode.
If you click and hold down the Run button, you’ll get more options to run your app:

Test to run your unit tests if you have them in your project.
Profile to measure various aspects of your application such as performance, memory usage and more.
Analyze to let XCode analyze your code and check for potential leaks or bad practices.
You can read more about these actions in the Apple iOS Documentation.
The dropdown beside the Stop button indicates which build target you want to run (in most cases, you’ll have only 1) and you can also choose if you want to run it under the iPhone or iPad simulators (or different version if you have them installed). The selection “iOS device” is to run your app on your device if you have it plugged in and properly provisioned (which needs a whole tutorial in itself!).

And finally in the far right side of the toolbar, we have the editor view buttons, the buttons to toggle various XCode panels on or off and the Organizer button.
6. The XCode Organizer
The Organizer button on the far right of the toolbar brings up a separate window called the Organizer. There are several different purposes of the organizer and we’ll highlight them below.

Devices
There are a lot of things you can do in the devices tab that I can list them all. However, the main uses are to manage your provisioning profiles on your system AND on various devices. We haven’t talked about provisioning profiles yet, but they’re important for deploying your app on actual physical iOS devices. I’ll need to create a separate tutorial for that.
You can look at crash log from devices, enable development use for various connected devices and more.
Check the Apple Documentation for more features of the devices tab.
Repositories
This only applies to XCode 4.
In XCode 5, Repositories are now managed in XCode->Preferences->Accounts
In the repositories tab, you’ll be able to manage local and remote repos that you have set up for your projects.
Projects
In the projects tab, you can see a list of projects you’ve opened before so you can quickly open them again and you’ll be able to manage derived data and snapshots of your projects as well.
Archives
In the archives tab, you can manage your archives for various projects. You would archive your app when you want to deploy it to the store or distribute it in some other manner.
Documentation
This is only for XCode 4.
In XCode 5, Repositories are now managed in XCode->Preferences->Downloads
You can view various iOS SDK documentation here.
7. The iOS Simulator
XCode 5 comes bundled with a wonderful iOS Simulator for you to test your application on. In fact, you can use the iOS simulator for most of your development and then find a device to test on when you’re nearly done.

You can actually do a lot with the simulator including:
-Device rotation
-Simulating various GPS coordinates
-Device shake
-Simulating low memory scenarios
If you want to test various network or low bandwidth conditions, there’s a tool called Charles Proxy that works brilliantly. I’ve written a Charles Proxy Tutorial that you can read.
Let’s Summarize
In this part of the series, I’ve acquainted you to the various areas of XCode.
Now you understand:
-The Navigator, Editor, Utility, Debug and Toolbar Areas of XCode!
-The various code editing features of the editor area!
-The XCode organizer!
-The iOS Simulator!
What’s Next?
We’re going to put what we’ve learned into practice in the next part of the tutorial series. We’ll build a simple demo app that will use the XCode areas and features that we talked about today as well as the Interface Builder bits.
We’ll also implement the MVC pattern with a real example so you can solidify your understanding of what was discussed in this tutorial.
Now you have all the basic ingredients to start iOS app development. Get ready to start making some iOS applications!
Go To Part 5
Article From : http://codewithchris.com/xcode-tutorial/

Leave a comment